Sushi pattern, and I adore my new library bag. In the end, the Vintage Holiday pattern seems to have stolen most of the limelight here since I worked on two versions of it in September. Our QAL is finishing up in just two more weeks, so be sure to link up for a few prize drawings if you've been making the quilt yourself. Looking back over this month's projects, I'm happy to say that not only did I enjoy making every one of these pieces, but almost all of them are in daily use -- always the mark of a good project for me!
No luck on the weather change yet -- my car's thermometer was still reading 100 degrees this afternoon. I cannot wait for cooler temperatures to arrive at my door...
Happy October to all of you!
Linking up with Fresh Sewing Day at Lily's Quilts.

Sunday, September 30, 2012

Vintage Holiday QAL Week 9: Quilting

I had to laugh last Friday afternoon when I looked up from stacking my quilt layers on the kitchen floor in preparation for basting. My three daughters had dragged their chairs and pillows over near the edge of the carpet, each having decided that watching me was going to be far more entertaining than seeing another episode of Peep and the Big Wide World. When I asked if they were sure they wouldn't rather watch their show instead, Bunny insisted, "But Mommy, we like watching you!"

I absolutely love the way this looks like streamers falling down the surface of the quilt. This is by far the easiest quilting technique I've tried yet. Some time I need to play around with the other stitch settings on my machine for more possibilities.

I can't wait to see how you all decide to quilt yours. Be sure to share pictures as soon as they're done!
Linking up to the Let's Get Acquainted Monday Link-up.
Friday, September 28, 2012
Scrappy Christmas Potholder

My grandmother asked for a decorative potholder to go along with her Christmas quilt -- she loves to hang them up on display in her kitchen even though she really doesn't cook anymore. I used leftover scraps from her Vintage Holiday lap quilt and sewed it up quickly this morning before my parents left to go visit with her.

Nothing fancy going on here. Just scraps sewn together in rows and quilted on either side.

I used one of the Merry Christmas prints for the back. The retro style of this collection is just too cute.

Between the potholder and the quilt, I think Grandma is more ready for Christmas than I am at the moment!
Linking up to TGIFF and Finish It Up Friday.
Wednesday, September 26, 2012
Stringing Along

Shannon at luvinthemommyhood has a fun little link-up going on right now. We fill in the blanks on a string of sentences, post it on our blogs, and share the link at her original post. If you'd like to play along, you can find it here. Ready? Set? Here we go...
* i'm longing to make "a new purse" right now.
* i want to try "sewing" with some "Chicopee corduroy"
* i wish i could sew with "Little Folks voile" fabric.
* i dream of making "a dress for myself".
* i keep track of my ideas by "writing them in spiral notebooks".
* i'm inspired by "other bloggers".
* i would love to meet "all of you" in person.
* my favorite fiber is "linen".
* i like to sew with "cotton and linen".
* my favorite color is "blue".
* i rock at "fabric selection".
* i would like to learn how to make "clothes for me and my girls".
* i like to listen to "music" while i "sew".
* i bring my "books" everywhere.
* my favorite thing to "sew" is "mini quilts".
* my crafting space is "happy chaos".
* if i had my own crafting room it would be "full of vintage and retro decor".
* i sew with "a Brother".
* i like to "look at" "new fabric lines".
* i can never get enough "craft books".
* i adore "sewing".
* i also enjoy "baking" and "reading".
* i like to fill my shelves with "fabric and books".
* i create the best when i'm "working by myself".
* i am currently excited for "Tsuru by Rashida Coleman-Hale, Noteworthy by Sweetwater, and Posy by Aneela Hoey".
* right now i am "working on an English paper piecing block".
* i love to watch "Jane Austen movies" while creating.
* my guilty pleasure when it comes to creating is "playing with fabric selection and design".
* my current favorite music crush to listen to while creating is "Third Day".
Happy Thursday, everyone!
Retro Library Case

I absolutely adored this year's Zakka Sew Along featuring Zakka Style by Rashida Coleman-Hale. The projects were fun and useful, and I learned so many new techniques as we moved through the book. But perhaps the best lesson I learned is that it's important to make any project your own. Patterns and books are just a place to start. While there are times that it's helpful to make something exactly the way it's written in a book, sometimes it's a good thing to let your creativity steer you in different directions.

I've been falling in love with Japanese patchwork lately, and buying a copy of Natural Patchwork by Suzuko Koseki just made me feel the love even more. There are a number of gorgeous projects in this book, but I was immediately drawn to her Courthouse Steps Zipper Bag -- so different from any other bag I've made before. It's been on my list of projects to try for weeks now.

For my version, I decided to forgo the patchwork front and use a panel from Melody Miller's Ruby Star Shining collection that I've been saving, maching it with a dark teal linen blend from my local quilt shop for the rest of the exterior as well as the lining. I changed the shape and size slightly so that the bag would be large enough to hold my books when we take a family library trip -- if I had gone just a little larger, it could have held my laptop too. Since I prefer longer handles, I extended those a bit as well.

I like the texture and stability that the bag has due to all of the quilting. I kept the back clean and simple so that the focus would be on the front of the bag.

The only other pop of color is the inside pocket which is also from my Melody Miller panel. Sewing the binding on the inside of this bag was a pain, and I have the pricked fingers to prove it. Still, I like the added structure that it gives the bag.

Between the front print and the overall shape of the bag, I think it has a nice retro charm to it. I'm already using it to carry around my books -- by the way, you must check out the two titles pictured above if you get the chance -- and I can't wait to bring it along to the library later this week.
And now on to the next project!
Linking up to Craft Buds.
Monday, September 24, 2012
Pin It to Win It!
Randi has started a fabulous contest through her beautiful Etsy shop, Fresh Squeezed Fabrics. I've ordered from her in the past with wonderful results, so definitely check out her shop if you've never visited before!
Here are the contest details:
")
I would absolutely love to win her bundle of Bella by Lotta Jansdotter -- such a darling collection and so perfect for fall. If you're on Pinterest and wouldn't mind repinning for me, you can find my pin at http://pinterest.com/pin/58265388900368285/. And if you're playing along, just send me a link to your pin -- I'll be happy to repin yours too!
What a fun way to start the week!
Here are the contest details:
I would absolutely love to win her bundle of Bella by Lotta Jansdotter -- such a darling collection and so perfect for fall. If you're on Pinterest and wouldn't mind repinning for me, you can find my pin at http://pinterest.com/pin/58265388900368285/. And if you're playing along, just send me a link to your pin -- I'll be happy to repin yours too!
What a fun way to start the week!
Sunday, September 23, 2012
Vintage Holiday QAL Week 8: Quilt Back

The wind was not my friend this afternoon as I tried to take photos of my Vintage Holiday quilt back, but hopefully you can still get a feel for how it looks. The top picture was taken in the bright light of our back yard, while the other two are from the shade of our front lawn (I finally surrendered when the quilt blew down off the clothespins and halfway across the patio), so you'll see a little variety in the colors. You'll notice that the edges aren't exactly squared up on the backing yet. I never fuss too much about the edges of a quilt backing since they're always a little large to leave room for any shifting during quilting. Everything will be tidied up later during the binding process.

I had so much fun piecing together a large scrappy ornament for the back of this quilt. In fact when it was done, I was awfully tempted to set it aside for a pillow cover instead. I may just have to make another one of these in the next month or two for a pillow to go along with the quilt. For the rest of the backing I kept pulling various prints that I had in my fabric closet until I had a layout that I liked. It's bright and cheerful, and I'm happy to know that the back of the quilt will be just as festive as the front.

This week I'll start on my quilting, and I think I'll probably go ahead with the vertical wavy lines that I used on my grandmother's version of this quilt. I loved the way it turned out on hers, and it's a fairly forgiving style of quilting for me. With all the work I've put into this quilt, I'd hate to ruin it now!
It's great to see all the lovely quilt tops showing up in the Flickr group, and I'm happy to see that people are still joining up this far along in the QAL -- the more the merrier, I say. Remember, you still have a few weeks left before we have the final link up next month and those great random prize drawings!
Saturday, September 22, 2012
100 Day Hustle

I always seem to be walking a delicate line between trying to get more things done while at the same time slowing down to enjoy my life. Sound familiar to any of you? Last night I took some time out to let the girls run around on the front lawn as the sun was going down. They had a blast playing tag and picking the last of the daisies, and I was happy just to sit and watch them. It reminded me how important it is to take those quiet moments when they come.
As I mentioned yesterday, Kelsey is having a wonderful event called the 100 Day Hustle in which we all make lists of what we need to get done before 2012 waves goodbye. While this was a daunting task for me to face at first, I'm so glad that I worked on this list today. Having my mind cluttered with all the things I needed to do was becoming overwhelming, and it didn't look quite as bad as I was afraid it would once I saw everything down on paper. So here we go...
MUST DO
1. Christmas potholder for my grandmother
2. Finish Vintage Holiday quilt (backing, quilting, binding)
3. EPP block for Travellin' Pic-Stitch Blog Hop
4. Modernista Swap Project
5. Modern She Made Swap Project
6. Play quilt for my nieces
7. Diaper bag for my sister
8. Camera bag for my brother-in-law
WOULD LIKE TO DO
1. New purse for me
2. Pillows for the family room
3. New advent calendar
4. Tula Pink Sew Along project
5. Finish new quilt for Bunny's bed
I have no doubt that there are other things that will make their way onto both of these lists, but this is a place to start. Hopefully if I can get my projects organized, I'll be able to get my time organized a little more efficiently too...which means more happy moments like last night.
And that's definitely a good thing.
Linking up with the 100 Day Hustle.
Friday, September 21, 2012
Swapaholic
Swaps are always such an amazing experience for me -- stressful (will my partner really like this??) yet exciting (someone is making something special for me!) and always pushing me to be at my creative best as I make something for my partner. I'm in the second round of two different swaps right now, and both are full of incredibly talented and wonderfully encouraging ladies.
In the Modernista Swap, we're moving to a different room of the house for each round. Last time we made an item for the sewing room, and this time we're creating something for the kitchen. I just loved putting this mosaic together!
The Modern She Made Swap is completely wide open as to what we make. The only requirement is that it include a specific shape. Our first round was all about circles, and this round has to include a triangle somewhere in the pattern, fabric, quilting, etc. Like I said, these are creative people! You can see my mosaic for this project above. I love all the color in these pictures!
If you've never been in a project swap before, I highly encourage you to try it at least once. When I first went looking for one, I had a hard time figuring out how to join. The best way I found to do it was to join the flickr group for the swap. Then you just keep your eyes open for announcements about when sign-ups are going to happen. I don't recommend being in too many swaps at once -- two is my limit. It just becomes too much for me to juggle along with my other projects. If you're looking for information on swap etiquette, my friend Katie has a wonderful post about that here. Getting that surprise package in the mail from your partner is always such a wonderful treat. There's nothing like happy mail from a friend who made something just for you.
By the way, thanks to all of you for your sweet comments on my Vintage Holiday lap quilt. My grandmother was absolutely thrilled with the quilt and left at least two messages on our answering machine before we even got back home telling me how much she loved it. Such a happy end to a fun project...
 |
| My Modernista Round 2 Mosaic -- details here |
 |
| My Modern She Made Swap Round 2 Mosaic -- details here |
 |
| My surprise package from the last Modernista Swap -- so amazing! |
By the way, thanks to all of you for your sweet comments on my Vintage Holiday lap quilt. My grandmother was absolutely thrilled with the quilt and left at least two messages on our answering machine before we even got back home telling me how much she loved it. Such a happy end to a fun project...
Thursday, September 20, 2012
Vintage Holiday Lap Quilt

Hallelujah, it's done! Thanks to my darling husband who entertained the girls for almost an hour after dinner while I finished hand stitching the binding upstairs in our room, the Vintage Holiday lap quilt is ready for delivery. It was a lot of fun to make a version of this quilt that is so different from the one I'm making for the QAL, and now that I've completed this project, I'll be starting on the backing for my own quilt tomorrow.

When my grandmother asked me to make this quilt for her, she had only two requests: Christmas themed fabric and a green border on the front. I made sure to add both. Because this was a lap quilt, I dropped the number of ornaments from twelve to just nine and eliminated the inside grid of sashing as well. It gives the quilt a simpler look and makes it the perfect size for a lap quilt.

I love the retro prints in the Dear Mr. Claus collection by Cosmo Cricket -- you would think that they were truly vintage if you didn't know better. My layer cake was enough to make all the ornaments and part of the backing with plenty left over for other projects. I also used a green snowflake print for the border and backing, one of the stylized red and green ornament prints for the rest of the backing, and a red striped print for the binding that looks just like it belongs on a candy cane.

For the quilting, I returned to the wavy stitch on my sewing machine that worked so well for last month's baby quilt, only this time I sewed rows across the entire face of the quilt. I love the way it makes me think of ric-rac, garlands, and icicles...

I cannot wait to deliver this to my grandmother tomorrow. She's been one of my biggest cheerleaders since I started sewing and has often insisted on funding my fabric purchases so that I could afford to make the projects you see on this blog. Though she has no computer and very poor eyesight, she uses a magnifying glass to study the details on my sewing projects in the pictures I send her, and she's been so excited to hear about the QAL and all of you who are taking part in it. It has given me so much pleasure to make this quilt for her.
Wishing you all a wonderful weekend!
Linking up to TGIFF.
Wednesday, September 19, 2012
Almost

My Vintage Holiday lap quilt is almost finished. It just needs a border, backing, quilting, and binding. Okay, maybe "almost" is a strong word... At any rate, I'm hoping to have pictures tomorrow since we're delivering it to my grandmother on Friday.
So many wonderful things happening in the blogging sphere right now that I can hardly keep up. But here's a sampling...
Rachel of Stitched in Color has A Skill Assignment for us -- such a great post. I can't wait to steal a few minutes of quiet time this weekend to journal about this one myself.
Amy of During Quiet Time is sharing a free pattern for her new Indie Bag. The bag is darling, and I'm still dying to get my hands on some prints from this gorgeous fabric line which is so perfect for fall.

Kelsey of Kelsey Sews wants us all to do the Hustle -- well, sort of. She's organizing the 100 Day Hustle to help us get all our projects done before the first of the new year. I'm excited to be doing a blog post for the event next month, but mostly I'm just paralyzed at the thought that there are only 100 days left in 2012...

If you love English paper piecing, photography, and color palettes, then you must check out Laura's Travelling Pic-Stitch Blog Hop at Quokka Quilts. I've just started working on my stop on the hop for the first week of October, and this looks like it's going to be a fun project.
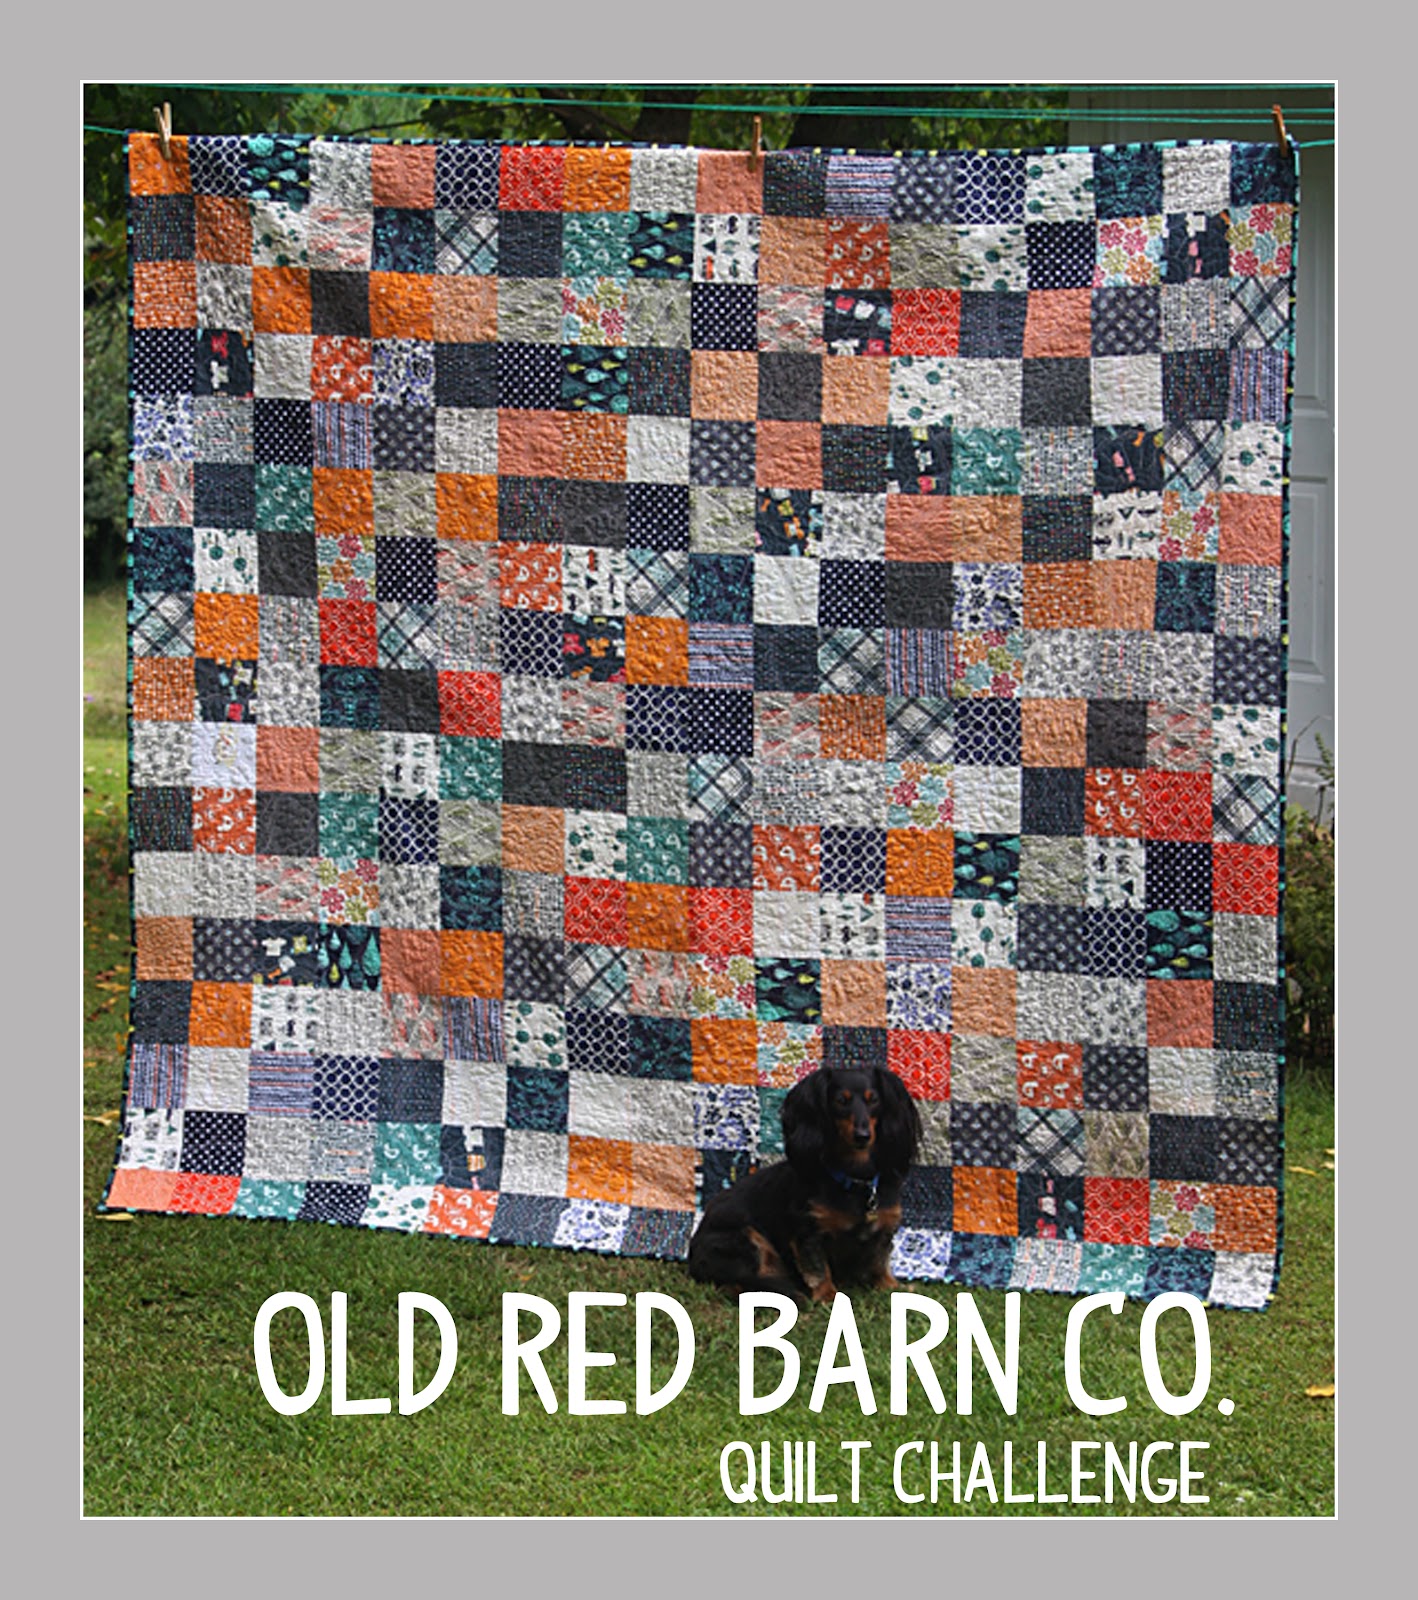
If you like color palettes but prefer quilts, Dana is holding a Quilt Challenge Throwdown at the Old Red Barn Co. Prizes abound in all of the above events, so be sure to take a peek.
And now with all that in mind, I need to go work on a very long to-do list...
Happy Wednesday. :)
Monday, September 17, 2012
Vintage Holiday QAL Week 7: Quilt Top

It was wonderful to finally sew these quilt blocks together into a finished top.

I knew from the beginning that I wanted to use the blue flowered print as my outside border, but I had debated what color to use for the inside grid. It came down to this multicolored print (which looks grey from a distance) or a variation on a red stripe. When I auditioned the red print, it was just too much red -- all the other colors seemed to drain away. I like the way my final choice allows all the colors to shine. I'm saving the red print for my binding, which I think will be a nice frame around the entire quilt.

Here is my new and improved Block 11 after last week's minor debacle. I'm so glad I caught that mistake before I sewed the blocks together!
I'm excited to start work on the quilt back this week. My plan is to pull together all the leftover pieces from making the blocks and use them to make one or two giant scrappy ornaments on the back. We'll see how it goes. First I need to finish my grandmother's Vintage Holiday lap quilt. I'm hoping to have an update on that one tomorrow, so stay tuned!
Sunday, September 16, 2012
Sushi Plate Lunch Mat
Normally I'd be doing a Vintage Holiday Quilt post right now. Unfortunately I wasn't able to finish my quilt top until after dark, and I just couldn't bear to take an indoor picture of this one. Tomorrow morning I'll get a shot of it on the back patio and have a post for you before lunch, so be sure to check back. I'm so happy with how it turned out!

The incredibly talented Kristy of Quiet Play gave me the chance to test one of her upcoming paper piecing patterns: Sushi Plate. This is my third try at paper piecing, and I love it more each time I do it. This pattern was so much fun to put together.

I used the newspaper print from Maude Asbury's Crabtastic collection for the background. I love using text prints, and this one fit the theme so well that I had to include it somewhere. The rest of the block is made from scraps by Lizzy House, Cosmo Cricket, Violet Craft, Joel Dewberry, and Michael Miller. I added a border of grey linen to make it the right size for my husband to use it as a lunch mat at work in his classroom -- large enough for a plate but narrow enough to fit on the edge of his desk below the keyboard. The back is just a single piece of the orange Jewels print by Lizzy House which I used for the fish on the front. While the mat edges look slightly wonky in the first photo, they're actually straight -- not really sure what was going on there, but it was probably the linen acting up a bit for the camera.

This project was such a delight from start to finish. Be sure to check Kristy's blog if you'd like to snag a pattern for yourself in the weeks ahead. I've come to enjoy pattern testing so much. If any of you are ever looking for someone to test a new pattern of yours, just send me an email at hjstaples@gmail.com. I'd love to help you out!
Linking up to Manic Monday, Let's Get Acquainted Monday Link-up, and the return (yippee!) of Sew Modern Monday.
Saturday, September 15, 2012
The Elephant in the Room
 |
| The Cheeky Imposter |
That would be because I didn't.
And because quilters are the nicest people in the world, you were all too sweet to say, "Gee, Heidi, you kind of made the wrong block for number eleven there..."
So tomorrow I will be making an actual block number eleven and finishing my quilt top. And my world will make sense again...
Wednesday, September 12, 2012
Cleaning House

There's always this list in the back of my mind of things that I need to tidy up around the blog. This week I was able to get a few things done that I've been meaning to do, and I wanted to let you know about it.
First, where can you find me other than here? I've added the links to my About Me page, but if you're looking for me elsewhere you'll find me on...
Flickr at http://www.flickr.com/photos/fabricmutt/
or http://www.flickr.com/groups/inspiredbyfabricmutt/
Twitter at https://twitter.com/fabricmutt
Pinterest at http://pinterest.com/fabricmutt/
Email at hjstaples@gmail.com
Second, after reading all of your wonderful thoughts about what you'd like to see on the blog this year, I decided to create the Links page that I've been meaning to add for a while now. While I may write about some of these topics in the next year, there are some amazingly talented and knowledgeable people out there who have already explained them in full detail, and I'd love to point you in some great directions. I'll be adding to this page from time to time with more links and topics, but for now you can find links to information on...
Beginning Sewing Skills
Color Selection and Fabric
Selling Your Work
Blogging
Making Bags
Let me know if you have any questions or suggestions. I'm always here!
Tuesday, September 11, 2012
Fall Patchwork Table Mat Tutorial

Several of you have asked me lately to talk more about how I choose the fabrics and colors that I use in a project, so I thought I would share a bit about that in my tutorial today. I've been wanting to make something for fall, and this table mat seemed like the perfect weekend project. This tutorial is meant to be a guide to the process; I don't give you any specific measurements only because I know that everyone is going to need a different size and shape for their table.

I've been poring over books by Suzuko Koseki lately, and I'm loving the simplicity of her patchwork projects. I knew that I wanted to make a simple table runner with three inch squares on one side and a single piece of fabric on the other. So I went to my stash and just started randomly pulling out any fabrics that felt like fall, either because of the colors or the print. The stack above is almost all of the prints I had out when I was finished.
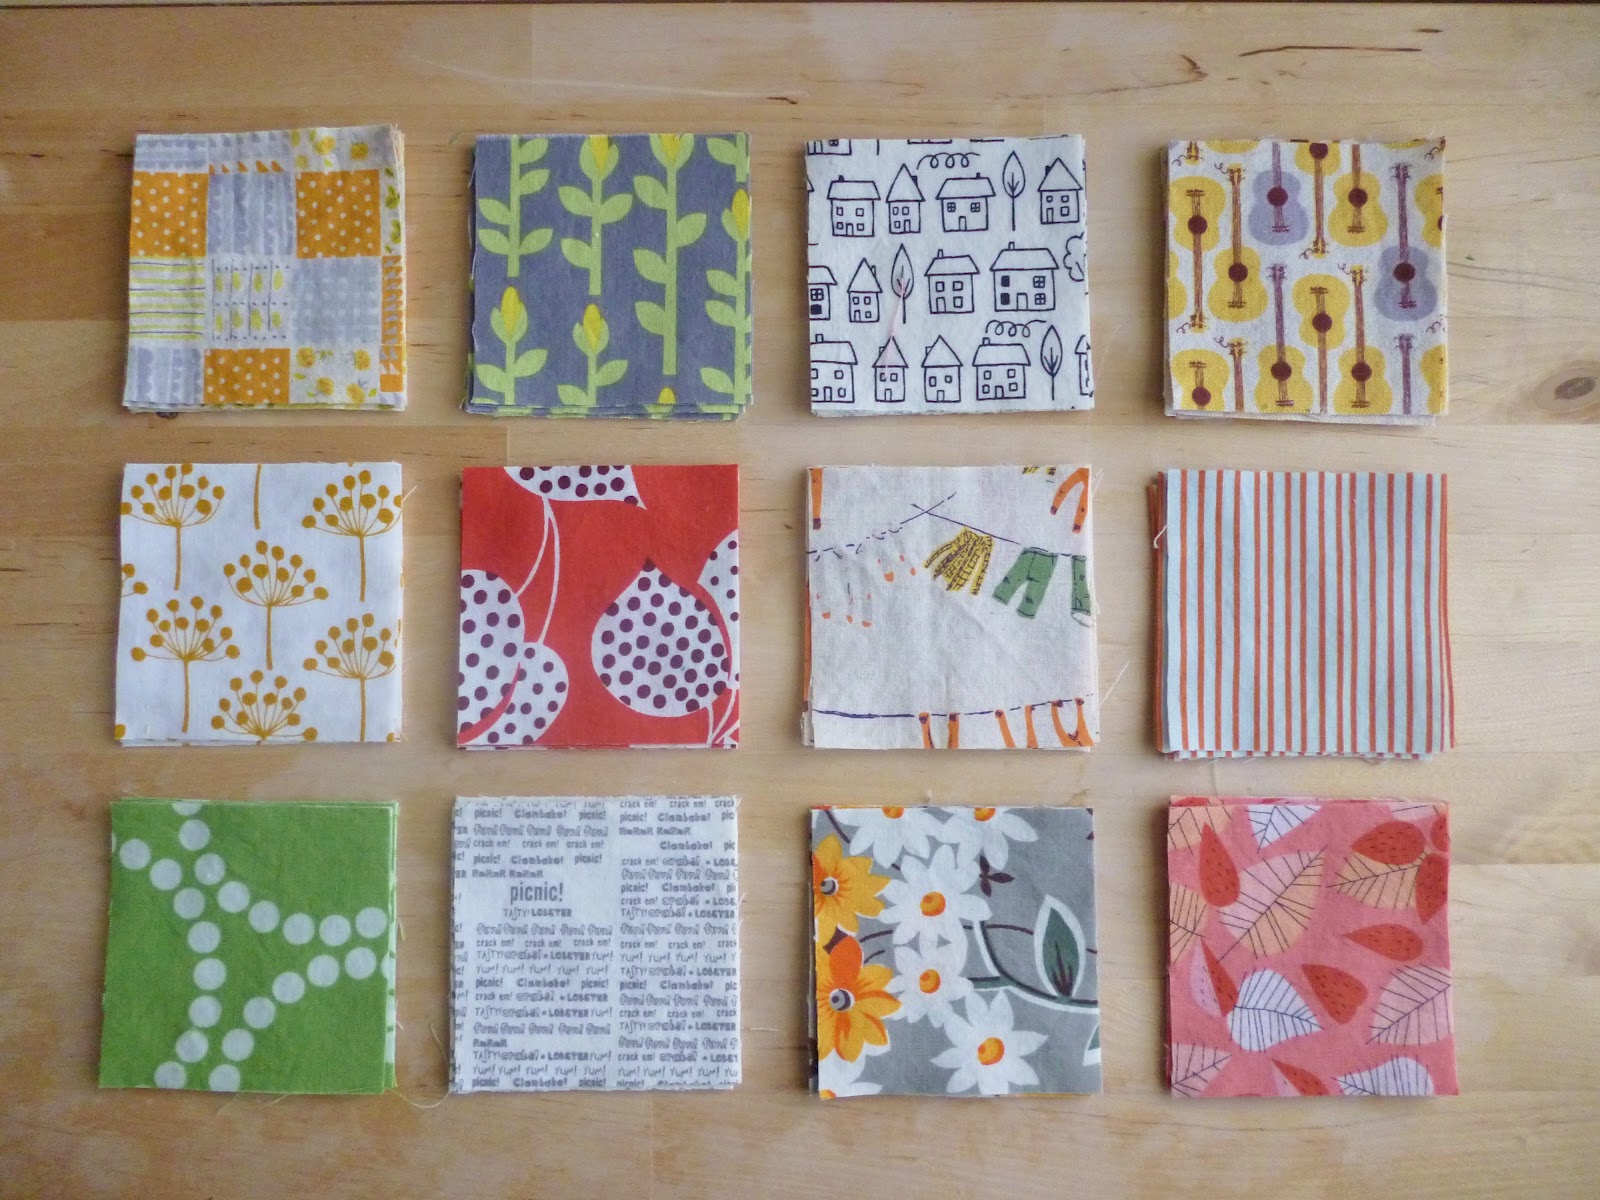
I then sorted these even more, pulling out a print here and there, grouping things that looked good together, and trying to find a nice balance between low volume patterns (prints with a white or neutral background) and more colorful prints. I wanted a mix of dots, stripes, text, colors, and even a little linen thrown in -- my three Heather Ross prints are all linen blends, while the rest of the fabrics are cotton. Once I had a group of fabrics that I liked, I cut out six three-inch squares from each print. I wasn't sure exactly how large my runner would end up being, but I would rather do all the cutting up front than have to go back and cut more later. Extra pieces can always be used for other projects.

At the last minute, I switched out the pink Lizzy House print for a brown wood grain pattern from Aviary 2. While I loved the leaves, I felt that the pink threw off the color scheme just a bit for me, and I liked the way the brown warmed up the entire palette.

Once you're set on your prints, start lining up your squares. Take your time and play around with it. I chose to alternate low volume and darker prints to emphasize the patchwork look. I also like to make sure that the same prints aren't right next to each other so that there's a nice variety throughout the piece.

Start sewing the squares together. While this sounds simple, it's really easy to make mistakes. A difference of just an eighth of an inch can throw off your rows badly, so it's important to match up the seams carefully as you go. Rather than doing one long row at a time, it's a better idea to sew the squares together in groups of two or three and then sew the groups together, pressing and matching up all the seams as you go along. Have a seam ripper handy just in case.

Once you've sewn all your squares together in the shape and size you need, cut a piece of batting and a piece of backing fabric to complete your table mat. Stack them in this order from the bottom: batting, backing fabric (right side up), patchwork fabric (wrong side up).

Pin the pieces together and start sewing a quarter inch all the way around your stack, leaving a 6-7 inch gap for turning on one side. Clip your corners and turn the piece right side out, pushing out the corners inside with a chopstick. Press the mat, turning the raw edges of your gap inside so that they match up with the rest of the finished edges.

Sew all around the mat again, a quarter inch from the edge. Now go back and quilt the piece. I chose to sew a quarter inch from either side of every patchwork seam on the top. Once you finish that, you can use and enjoy -- it doesn't even need any binding!

Please let me know if this tutorial is useful to you. While I love sharing projects that I enjoy making, I also want to give back to our quilting community by sharing tutorials that are helpful to all of you. If you make one of these -- or any project I've shared on the blog -- please join my Inspired by Fabric Mutt Flickr group and post a picture. I would love to share pictures of your projects in an upcoming post!
It's wonderful to see this fall runner on our table. It makes me so excited about the coming holidays. Even better, my father absolutely loves this table mat -- and when Dad likes a sewing project, that's a pretty high compliment in our house!
Linking up to Fabric Tuesday.
Subscribe to:
Posts (Atom)