Monday, December 22, 2014

Merry Making

Hadley Case by Fabric Mutt

December has been the month of the never ending cold virus at our house. In spite of all the coughing and sneezing, though, I've been snatching a few moments to sew whenever I can. I finally had the chance to try out Kelby's fabulous tutorial, and it has changed my life, I tell you. Why did I never think to finish off the edges of my pouch linings with a zig zag stitch? As someone who adores the look of a structured case, that last step of binding the raw edges inside has so often kept me from making one. No more of that! The case you see above, made with Denyse Schmidt's gorgeous Hadley collection, has been sitting in my WIP pile for weeks because I couldn't face the time it would take to properly bind the lining. I'm thrilled to death to have this project done at last!

Cotton + Steel Dopp Kit by Fabric Mutt

Using Kelby's tutorial, I made a Dopp Kit for my Dad using new canvas prints from Cotton & Steel.

Cotton + Steel Dopp Kit by Fabric Mutt

I love that Tokyo Train Ride lining inside this pouch!

Melody Miller Makeup Pouch by Fabric Mutt

I also made a smaller version of the pouch using Melody Miller prints. This will be a perfect little makeup bag to fit in my luggage for our Christmas trip to Arizona this week. 

And speaking of Christmas, I hope you all have a wonderful one. Hugs to you, friends!

Tuesday, December 9, 2014

When Your Hobby Becomes Your Job


All of us started sewing because we fell in love with it one way or another. We felt creative and inspired. We found something that both energized and relaxed us in the midst of our crazy schedules. In time, some of us even made the decision to take our hobby to the next level -- starting a blog, writing a book, designing fabric, writing patterns, opening a fabric shop, teaching classes. It was fun and exciting to see those doors open, and we were thrilled to have even more chances to do what we loved.

But one day you wake up, and something's different. It's not that you don't still love what you're doing, because you do. It's just that now this isn't something you get to do for fun whenever you feel like it. There are expectations, deadlines, maybe even financial obligations tied to this thing that you used to do when you were trying to escape all of those responsibilities.

What do you do when your hobby becomes your job?

I've seen enough on blogs and social media to know that I'm not the only one who's faced this reality shift, so I thought it was a topic worth discussing. Here are a few things I've learned in my own journey...

1. Find a way to play. The truth is that when your hobby becomes your job, you're left without a hobby. Either something else needs to take its place, or you have to find a way to divide things up so that some tasks are for work and some are for play. Are you running a fabric shop? Be sure to give yourself time to not just cut fabric, but to actually sew with it. Are you writing patterns? Take a break from pattern testing once in a while to make something just for fun. If you can't find that balance, try picking up something else that helps you be creative in a more relaxing way: drawing, painting, knitting, photography, crochet, music, sports, reading, etc. You may even discover another talent that you didn't know you had.

2. Don't take yourself too seriously. When you start a new adventure like this, it's a big deal. You should commit to it, celebrate it, and give it your all. At the same time, though, it's important to keep things in perspective. When I got my book contract, I was totally consumed by the project for months on end, trying to get every last detail just right. Some of the best advice I received was from my family. "Heidi, it's an amazing thing that you got to write this book," my mom told me, "and you'll always be able to look back and be glad that you got to do it. But don't ever forget that the book is just something you did. It isn't who you are." As my husband put it, "It doesn't have to be the best book ever written, sweetheart, just the best book you can write." Cut yourself some slack. You're not going to be perfect in any area of your life, including this one...and that's okay. Do your best and let the rest go.

3. Be honest with yourself. I'm the poster girl for overcommitment, and every few months it catches up with me. It's easy to feel that, because this is something you love to do, it's okay to load yourself up with more obligations in a week than any reasonable person could achieve in a month. It's also tempting to commit to some projects for free that cost you a lot in time and materials because you want to get your name out there. I personally feel that there's no hard and fast rule on these issues. There are times when you're going to have to work your tail off, and times when you desperately need to pull back and reevaluate your commitments. There are moments where you're going to put in a lot of work for less compensation than you probably deserve, and other moments when you need to hold out for a better offer. Deep down, we usually know which is which if we're brutally honest with ourselves. Take time each week to refocus and prioritize so that you can stay clear headed and know that you're making the best decisions for your situation.

4. Be willing to count the cost. I think sometimes we feel that a hobby-turned-job is in a different category than an ordinary, run-of-the-mill job...but it really shouldn't be. There's a line between our dreams and our reality, and it's important to know where that line is. Working on my book for almost two years has been a fabulous experience in so many ways, yet it has definitely come with a cost. Thankfully my family was able to make the sacrifices necessary for it to happen, but if this had come a few years earlier, we could never have managed it. If you're struggling or unsure of your situation, ask yourself a few questions, such as...
  • Am I making ends meet? Can I sustain this financially?
  • Would I be willing to do this for any other typical 9-5 job?
  • Is this working with my family situation? Are the sacrifices that they're making (or I'm making) worth it? Will it be easier if I wait a year before doing this? Three years? Five years?
  • Is this is an offer that I just can't turn down or is there another way to make this happen that works better with my situation? Have I weighed all my options?
If you're happy with your answers to these questions, that's fantastic! Pursue your opportunity in the knowledge that this is the right thing for you and your family. If you look at your situation, though, and realize that things aren't working out the way you hoped they would, there is no shame and much wisdom in changing course. It's ideal if you can weigh the sacrifices before you start a venture like this, but never be too proud to stop and refocus, even in the midst of things. It doesn't always mean that you have to quit what you're doing; sometimes it just means that you need to start doing things a little differently to make it work.

I'd love to hear from those of you who are dealing with these issues in your own lives. What's your advice?

Monday, December 1, 2014

Merry Mug Rug Blog Hop


When my friend Jennifer asked if I would be a part of her Merry Mug Rug Blog Hop, I was so happy to join in the fun. A mug rug is just about the perfect holiday project: a quick finish that brings something special to your home in the middle of a busy season.


When I think of Christmas, I think of family photos. My grandmother, who passed away last spring, was constantly pulling out her Polaroid camera when I was a little girl. I was always mesmerized by watching those pictures appear like magic after a minute or two. Grandma loved to scribble notes on the white border at the bottom of the picture and put them up all over her house, especially in her kitchen. The one above was taken by my mom when I was almost four years old, and I love it so much. It's been over a year since I've played around with Polaroid quilt blocks, but I was eager to pull out Karen's great tutorial for my Christmas mug rug. These are so perfect for fussy cutting, and I had just the right fabric in mind: Merry Main Street by Alexander Henry. I love the retro nostalgia of this print!


My polaroids are framed in a white sketchy print by Carolyn Friedlander from Architextures, and the background is lime green linen Mochi Dots which I also used on the back of the mug rug. The piece is bound in a red and white scalloped print from Miss Kate by Bonnie and Camille.


I used red embroidery floss to stitch some scribbled notes at the bottom of each "picture" just as if they were pressed in a family album. The embroidery was all done without any tracing since I wanted it to look like someone really had just dashed off a few notes in a hurry.

This was such a fun project, and though I'd originally planned to give it away, I found that I just couldn't bear to part with it when it was finished. The mug rug is definitely going to be coming out with the Christmas decorations every year from now on!

Jennifer has a wonderful giveaway on her blog for a $30 gift certificate to Southern Fabric which you can enter through December 14. She'll also be sharing more fun mug rugs from other bloggers over the next two weeks, so be sure to check back for more Christmas inspiration. Now I'm off to find some tea and a few more of those cookies...

Sunday, November 30, 2014

Sew the Library Monthly Link-up: Coming in January!


It seems that I'm not the only one with a shelf of neglected sewing books. Several of you mentioned that you were also hoping to sew through your own libraries in 2015, and a few of you even asked me to start a monthly link-up to keep us all gently accountable. As a result, we're officially launching a Sew the Library Monthly Link-up in January!

From the 20th until the last day of each month, you can link up any project you've made from a sewing book or magazine during that same month. We'll make an exception in January and let you include anything from December too, since I'm hoping you'll get some Christmas goodies that you can use for this! In your post, be sure to mention the book you used and feel free to include a photo or a link to where it can be purchased so that others can easily find it too. The January link-up will be here at Fabric Mutt. In February, we'll be linking up at Martha's blog Weekend Doings, and in March, you'll be linking up with Jodi at Tickle & Hide. I'm so grateful to these sweet, talented friends of mine for giving me the push I needed to get all this started!

We're going to give this a trial run for three months, and if we can get a group sewing along, we'll keep it going through the rest of the year. This is not only a great opportunity to sew through our own libraries, but it's also a great way to get exposure to new books we might have missed along the way. If you have any questions, just send me an email at hjstaples@gmail.com or leave a comment below. I'm pretty excited to get started!

Thursday, November 20, 2014

Sew the Library: Quilt-opedia


One of my goals this year is to Sew the Library. I have so many fabulous books on the shelf in my sewing room that aren't getting the attention they deserve, and that just shouldn't be. My plan is to make a project from one of my sewing books at least once a month, hopefully twice. This month I made a quick laptop sleeve from Laura Jane Taylor's lovely book, Quilt-opedia.


Quilt-opedia is a book that I've had my eye on for a long time. I really love Laura's talent for mixing colors and prints to produce a look that's sort of vintage modern. This is a nice book for beginners, since it goes into great detail on quilting techniques and finishing, but I also think it works well as a quick reference for gift projects during the holidays. There are tons of photos and illustrations, as well as a useful quilt block directory in the back of the book. I desperately want to make the Obsession Quilt featured on the cover!


My dear friend Becca snagged some new Cotton + Steel for me at Fall Quilt Market, and I've been torn between wanting to sew with it and being afraid to touch it. Last night I finally decided it was now or never, so I pulled out my favorite linen pieces from Playful and Mesa. This fabric...what else is there to say that hasn't been said by everyone else? It's so beautiful, so fun... I kind of want to upholster my entire sewing room in prints by Melody Miller, but for now I'm contenting myself with making a sleeve for my laptop. I followed Laura's great directions which gave me the perfect fit for my machine -- a victory that has sometimes eluded me with previous tech projects!


The pouch is lined in one of my favorite text prints, a dictionary design by Tim Holtz. I added a pink and white striped hair fastener (love that touch of whimsy!) and a vintage style leather button to make an easy closure so that I can keep the laptop secure when in transit. All the top stitching is done using gold Aurifil thread.

It always amazes me how truly painful it can be to sew with a treasured piece of fabric. The pressure is huge. Holding that finished project, though, and knowing that I'll be able to see this fabric every day on my desk...well, it feels pretty great.

Sew with a print from your special stash today, even if you just use a tiny piece of it. You'll be so glad you did.

Thursday, November 13, 2014

Introducing...My Book

 
Sew Organized for the Busy Girl by Heidi Staples for C&T Publishing

Oh, you guys...I can't believe the day has finally come when I can write this post! I've been working on this project officially since summer 2013, but it's been on my mental radar since the end of 2012. It's an absolute joy to present you with my book: Sew Organized for the Busy Girl, due out in March of next year. It's already available for pre-order on Amazon and C&T Publishing (where you can see some project pictures too!)..and yes, I'll admit that I check those sites once in a while to remind myself that this is all actually happening!

I've always tried to be real with you here, and I want to keep it that way. I wouldn't have written this book if I didn't hope that someone would read it, so I'll be sharing some projects and ideas from it in the coming year. However, I am not going to beat you over the head with my book from morning till night. It's really important to me that I keep this a place where I chat with you about what I'm sewing and how it all fits into daily life...and honestly, Sew Organized is just an extension of that. I wrote it for all of you out there who, like me, are struggling to fit sewing time into your busy schedule. If there's anything special you'd like to know about it or would like to see in a book tour, feel free to let me know in the comments below, and I'll do my best to work it in. I really want this to be actually helpful to you!

But the details will keep for now. I'm off to celebrate with a little happy time at the sewing table...

Friday, November 7, 2014

Mochi Pot Holders


I had piles of dishes and laundry to finish on Wednesday, definitely two things at the top of my "no, thank you" list. For some reason, even the prospect of a fresh, clean house just wasn't motivating me this time, so I decided to set up a little rewards system for myself: clean for twenty minutes, play with new Cotton + Steel fabric for ten minutes. Wow, did I get motivated pretty quickly after that...


I've been meaning to make some more pot holders, and Rashida Coleman-Hale's adorable new Mochi line has just the right colors for brightening up my kitchen. I kept things as minimal as possible -- no piecing and very simple quilting. Pink and white twill tape made perfect loops for hanging, and I bound them in a grey canvas print from the collection. These finish at about 7" square. Now everybody's happy: my kitchen, my pot holders, and definitely me.

It's been a ridiculously long time since I've linked up with Finish It Up Friday at Crazy Mom Quilts, so I'm joining in on the fun today. Time to head over and see what everyone else is making...

Tuesday, November 4, 2014

Ever After Quilt


It feels like the Revenge of the Machines at my house today. My Singer has been fighting with me for a few weeks now, skipping stitches for no apparent reason. I finally had to admit defeat and take it in for a tune-up this morning, getting the sad news that I won't see it again for three weeks due to the holiday rush. Thankfully my sister still has the original Brother machine which first enticed me into the world of quilting three years ago. She brought it over this morning, and I felt downright nostalgic to be sewing with my Old Faithful again. I was able to finish binding the Ever After Quilt which I've been working on all week for my niece as a belated birthday gift. I grabbed my camera to take a few pictures before sending the quilt off with my sister, but of course, the battery was dead since someone (yes, me) had forgotten to turn the camera off the last time it was used. So we'll have to make do with cell phone photos today...


It struck me several weeks ago that Dreamin' Vintage by Jeni Baker and Far, Far Away by Heather Ross have unbelievably similar color schemes. In fact, they look absolutely darling together. The colored patchwork in the middle of this quilt is surrounded by tiny pink La Creme dots by Riley Blake. It's backed in one of Jeni's florals, and I bound it with a great aqua and cream star print from Unicorns and Rainbows by Doohikey Designs.


It all works perfectly together for a little girl's bed, and I was so happy to give this to my niece at last. Since I have two nieces, there will be another one of these in the works as soon as I finish up a few other projects on my list.


A few weeks back I shared Mouse's new seat cushion with you as a part of Riley Blake's Flannel Showcase Blog Tour. If you'd like a chance to play with some flannel yourself, they're giving away some fat quarter bundles here on their Facebook page. You can catch up with the rest of the fabulous blog hop projects at the links below in case you missed them the first time around. My girls are still asking for pajama pants from my leftover Sidewalks flannel. I guess I'd better add those to my list...

9/5 Riley Blake Designs - Flannel Play Dress
11/4 Riley Blake Designs Final Post + Giveaway

Saturday, November 1, 2014

Here and There


You'll find me here and there on this glorious first day of November, my favorite month of the year. I have a project in Issue 2 of fabulous new Make Modern magazine: the Tagalong Pouch which you see above. It's a quick project and one of my favorites. Some of you may remember seeing an early version of this on the blog last year when I made one to hold an electronic Leapfrog toy for Bear's birthday. These pouches are perfect for carrying everything from tablets to library books. Mostly, though, I love picking out the squares for the patchwork on the the front.

Image courtesy of Two Peas & Their Pod

 Today I'm also thrilled to be kicking off Sew Mama Sew's annual Handmade Holidays series with Gifts for the Glamour Girl. There are some really fun ideas in here that will work for your daughter, your best friend, or even yourself, if you should need some spoiling this month. I've also included my favorite recipe for Brown Butter Pumpkin Cupcakes with Salted Caramel frosting which is to die for. Every time I say that now, I can hear Marty Crane on Frasier saying, "Your country's to die for -- food is to eat." But seriously, these are almost that good...

Tuesday, October 28, 2014

Quilt Market Sewing: Handcrafted


The Handcrafted collection by Alison Glass is really as beautiful as they say it is. As a rule, I admit that I'm not so into anything approaching the category of "batiks," but she makes it work by keeping the designs simple and the colors brilliantly saturated. The fabric weight is perfect for garments and quilts, but Alison (who is, by the way, just as lovely as her fabric) asked me to make a few bags for her market booth. I made a Malibu Satchel and two variations on my Nora Clutch. The prints are paired with pieces of chambray by Andover, and I love the way they work so well together. I bought a layer cake of the collection after sewing up these samples, and I'm hoping to make a quilt before the year is out.

I always have mixed emotions when Quilt Market ends. Following all the fun on Instagram is exciting and inspiring, but it's also a relief to wrap things up and settle back into the pleasure of everyday sewing again. After an insanely busy October, I feel a bit like a child who has finished her school work and is ready to play...

Friday, October 24, 2014

Quilt Market Sewing: Birch Fabrics


Birch Fabrics is still one of my favorite companies to sew for, always featuring clever designs, beautiful color schemes, and the nicest people. Most of my Market sewing for them this time was done with the new Charley Harper line, Nurture. This nine patch baby quilt would be perfect for a little boy's nursery.


Here's a close up of those great prints. I love that bottom right block the most. Those colors are just perfect!


I pieced together leftover fabrics and a cheater print for the backing.


There was one extra nine patch block leftover from my original planning stages. I decided that it would make a fun little pillow to go with the quilt.


This owl fabric on the back is adorable, isn't it?


The Nurture canvas is just right for bags. I had a lot of fun fussy cutting this giraffe print for my Malibu Satchel pattern.


The feather prints are fantastic basics. I even cut a little piece of canvas selvage for a makeshift label instead of a pocket on this version of the bag.


They asked me to make one more Malibu Satchel out of prints from the new Serengeti collection by Jay-Cyn Designs. All those colors look so happy together...

I've been absolutely delighted to see the stunning booth that the Birch crew is putting together. Be sure to stop by their Instagram account @birchfabrics to get a peek!

Friday, October 17, 2014

Quilt Market Sewing: Wild & Free

Wild and Free Agave Clutch by Heidi Staples of Fabric Mutt

Getting the opportunity to sew projects for Quilt Market is never something I take lightly. There's no question that it's exciting to work with fabric that hasn't yet been released, but it comes with a strong sense of responsibility too. These projects are part of what designers are using to sell their fabric, and it's important to me that my work makes their work look good. My friend Maureen has a beautiful limited edition collection coming out with Art Gallery Fabrics this fall, and a few weeks back she gave me the challenge of making projects with pieces of her fabric that were approximately 3 x 4" or smaller. She also sent me some coordinating AGF solids to add to the mix. I had a great time seeing how creative I could get with these little scraps. While most market projects are made entirely from large pieces of fabric, I don't think it hurts to show people how a collection looks on a small scale too, especially since scrappy projects are always a popular choice with quilters.

Maureen's Wild & Free collection is a beautiful mix of bohemian and traditional styles, and it made me immediately run for my stack of linen to use as a background for all the projects. The version of my Agave Clutch above has the largest scraps I used on any of the projects. The yarn dyed Essex linen in leather works as a simple backdrop for the prints, and I also love the leather ties I used on the zippers -- something I repeated on all the projects I made with this collection.

Wild and Free Mosaic Bag by Heidi Staples of Fabric Mutt

I made a smaller version of my Mosaic Bag to feature the tiniest scraps. The half square triangles on here finish at one inch, and I adore the way they look. It's almost like having a small modern painting on the front of this piece.

Wild and Free Mosaic Bag by Heidi Staples of Fabric Mutt

Maureen's prints line up nicely along the top of the pocket on the back of the bag. I used Andover's denim colored chambray for the background and braided cream colored cord for the handles.

Wild and Free Hexagon Coin Purse by Heidi Staples of Fabric Mutt

The last thing I made was a little coin purse out of black Brussels washer linen. All these bags are lined in AGF solids, and this pouch has an interior of saturated gold that looks fabulous against the navy zipper and dark linen. Using a more limited color scheme, I made four tiny half-inch hexagons and hand stitched them to the front. It's a small accessory, but I really like the way this pouch turned out.

Definitely check out Maureen's blog to see the amazing things that she and others have been creating with her fabric. I know her booth is going to be drop dread gorgeous when all of these projects come together in one place!

I'll have more Quilt Market sewing to share with you next week, so stay tuned!

Thursday, October 9, 2014

Comfort

Acorn Trail Softies by Fabric Mutt

My parents left on a road trip before dawn this morning, and the next two weeks are going to be tough on my daughters, who are so used to having Grampa and Nana nearby for a hug at any given moment. So I couldn't have been happier when my latest order from Fabricworm showed up in the mailbox yesterday containing the Acorn Trail panel for these darling cut-and-sew animal softies. I've been swimming in Quilt Market sewing lately (pictures of that to come later this month), but I stayed up late last night to make some cuddly friends for my girls. I knew they would be needing them for comfort today.

I'm being honest here -- this isn't the best example of my sewing skills. It was well past midnight before I was through, and I was getting a little punchy at the end. God bless kids, though...they don't care if all the edges don't match up perfectly or the opening in the side isn't slip stitched closed. They just give you that happy smile and hug their new toy like it's worth a hundred bucks.

"Thank you, Mommy," Bunny said to me quietly as she cuddled her namesake this morning, "for staying up so late to make these for us."

And suddenly getting only five hours of sleep doesn't seem like such a big deal after all.

Tuesday, September 30, 2014

Four Corners Pillow Tutorial

four corners pillow featuring acorn trail by fabric mutt

Head over to the Fabricworm blog to check out my new tutorial: the Four Corners Pillow. It features Acorn Trail, Teagan White's latest too-cute-for-words collection for Birch Fabrics. This project is perfect for fussy cutting, but I think it would look pretty great in solids too. Thanks so much to my friends at Fabricworm and Birch Fabrics for letting me play with these gorgeous prints! If you make one of your own, be sure to share photos. You can tag me on Instagram @fabricmutt. I'd love to see it!

Monday, September 29, 2014

Sidewalks Seat Cushion

Riley Blake Designs Sidewalks Flannel Seat Cushion by Fabric Mutt

When my friends at Riley Blake Designs asked me to be part of their Flannel Showcase Blog Tour, I was so happy to say yes. In all my sewing experiences of the past few years, I hadn't yet sewn with flannel, so I was excited to have the chance to work with this type of fabric at last. They sent me an incredibly generous package full of the Sidewalks collection by October Afternoon. When I showed the fabric to my family after it arrived, my parents were absolutely charmed by the designs. "That's my childhood," said my Dad, and truly these adorable prints look like they came to my house straight from the 1950s.

Flannel is different from cotton, but not so different that it's terrifying. It reminds me a little bit of working with linen in that it's a little more fiddly sometimes, yet even then it doesn't stretch out of shape the way that linen can. In some ways, flannel seems more forgiving if your seams don't come out precisely the way you want them to. Since I've heard that shrinkage can be a problem, I washed all my material first, something that I never do unless I'm making clothes. Flannel comes out of the dryer so incredibly soft and warm that you just want to sit there and cuddle with it all afternoon. The only downside is having to iron out hundreds of stubborn wrinkles if you forget about it and let it sit in the laundry basket for a day or two...

Riley Blake Designs Sidewalks Flannel Seat Cushion by Fabric Mutt

Everyone at our dinner table has a chair with a built in cushion except my youngest daughter who sits on a vintage wooden school chair. I've been meaning to make a cushion for her seat, and this soft flannel seemed like the perfect material for the job. I wanted to keep my design simple and classic, so I decided to make nine hourglass blocks which I stitched together without any borders or sashing. The blocks are quilted in a pale aqua thread by Aurifil. For the back of the cushion, I chose a blue print since that's my daughter's favorite color. There is no insert for this cushion. I just filled it with stuffing and sewed all the way around the outside edge, a method I love since it adds the illusion of piping and neatly closes the opening in the side of the pillow.

Riley Blake Designs Sidewalks Flannel Seat Cushion by Fabric Mutt

I debated adding ties to fasten the cushion to the chair, but in the end I decided not to. It was a good decision. As you can see, the cushion fits nicely in the middle of the chair, making a cuddly spot for Mouse which can be easily moved if needed. You American Girl fans out there will recognize Kit's dog Grace modeling for the camera here. My Mouse decided from the start, however, that this dog's name was Snuffy, and she carries it with her everywhere...yes, even to the dinner table.

Be sure to visit the other stops on the tour for more flannel mania!

9/5 Riley Blake Designs - Flannel Play Dress
11/4 Riley Blake Designs Final Post + Giveaway

Saturday, September 27, 2014

Between You and Me

My Medallion pillow from earlier this month -- see the guest post here at Sew Sweetness.

It's been a thoughtful sort of week. First I heard that Sew Fresh Fabrics is closing down. Then I heard that Pink Chalk Fabrics is changing course. Finally I read Holly's post and the article that inspired it. It all has me thinking a lot about this online sewing community.

I've only been blogging since the end of 2011, but it feels like things have changed a lot in that short time period. There is SO much out there now. You can find a free tutorial for almost any project imaginable. Fabric companies are releasing more collections by more designers. There are tons of online fabric shops specializing in different bundles and themes. Sewing bloggers are moving beyond blogging to write books, design fabric collections, and start magazines. It's fun and exciting and so inspiring.

The best package of my week contained these lovely threads from my friends at Aurifil.

The downside is that it's getting much harder to come up with new material because, as my sister always reminds me, there's nothing new under the sun. Copycats are coming on the scene -- some who don't mean to and some who do. There's a constant drive to produce more information at a higher level of quality than ever before. People speculate about whether blogs have replaced magazines, whether Instagram will replace blogs, and what will end up replacing all of the above. I know traditional fabric shop owners who worry about keeping up with online shops, while online shop owners search for a way to stand out in the growing internet market. After all there are plenty of people in this community who are working hard to make their family living from creative blogs and businesses.

There's concern about blogger burnout, and for good reason. To publish a single blog post means that you must decide on a topic, develop your ideas, make the project, style the photos, take the photos, edit the photos, write the post, and edit the post. If that post is a tutorial, you can multiply the workload by at least five times. If you're working on a project for a blog hop, a magazine, or a book, it has to stay secret until the big reveal. So while you're doing all this work behind the scenes, you're also scrambling to come up with something else that you can share on the blog so that you don't leave your readers hanging without anything new. Layer that on top of the responsibilities of a family and career, and it all gets overwhelming really fast.

A stack of solids for an upcoming project...they remind me of sunset on our mountains.

After spending a few days mulling things over, I can't escape the importance of going back to the beginning. Why did we start all of this -- the patterns and the fabric, the blogging and the swapping? We did it because there's something in our souls that loves to create beauty, and it gives us so much joy to do it together. Meeting with you here once or twice a week is like sitting down with a friend in my sewing room, sipping tall glasses of iced tea and sharing our latest projects with each other. It's growing together, learning lessons through the rough times, and sharing the victories that come along the way. When burnout and controversy rise up, we give each other grace and the benefit of the doubt. Friends, after all, hope the best for each other, and in the end, whether we've met in person or not, this all comes down to the simplest of friendships between you and me.

So I'm not giving up. If blogs go the way of the typewriter and the cassette tape (both of which are still completely awesome, by the way), I'll still be here on whatever the next wave is that comes through. We'll still get together for our weekly visits, and yes, I'll still be sewing. Because honestly, I love it. There isn't anything else I'd rather do.

Wednesday, September 17, 2014

Today

Today I'm...

Fall Pumpkins Table Runner by Heidi Staples of Fabric Mutt

...loving pumpkins.


...playing with flannel.


...jumping on the homemade granola bars bandwagon. If you'd like to jump with me, this recipe is a pretty fabulous place to start...

Tuesday, September 9, 2014

Malibu Satchel Tutorial

Malibu Satchel Tutorial by Heidi Staples of Fabric Mutt

I made my first version of this little satchel over a month ago, and though I normally write a tutorial while I'm making a project, in this case, I'm glad it didn't work out that way. Living with this bag for a month gave me a chance to find both the strengths and weaknesses in the design so that I could make some necessary adjustments. I added an interior pocket since I was tired of having to fish around for my cell phone in the first version. I also added more interfacing to the lining and the flap, giving the bag a lot more stability. There were a few other minor changes, and they all make this satchel much better than the original. At 9 x 10 x 3", this bag is just the right size -- big enough to hold all my stuff without making me feel like I have a suitcase strapped to my side. I also love having both a removable cross body strap and a small top handle to choose from when I'm on the go. I've already carried my new satchel around with me for a week, and yeah, I really love it. I've decided to call this one the Malibu Satchel, since it has the carefree vibe of that lovely beach community.


For this version I used Robert Kaufman's Railroad Denim with a medium stripe in Indigo as my main print. The heavy fabric makes a good exterior, and the width of the stripes is spot on. Sarah Watts' gorgeous Monarch lion print makes an incredible lining and flap accent, kind of like having a classic children's book illustration on your purse. I used Netorious in Roadster from the Cotton + Steel basics for the inside pocket and an off-white cotton webbing for the straps. My hardware accents are from Joann Fabrics, and this time I went with an antique brass finish which nicely complements the denim. I ended up using circle rings for the side loops, but you can substitute d-rings or rectangular rings if you like. The thread is Aurifil #2220, a light salmon color which is a perfect match for the lining and a fun contrast to the exterior. And yes, it all coordinates perfectly with my Tsuru Have-It-All Wallet!

Materials
1/2 yard of denim for bag exterior
1/2 yard of lion print for bag lining and flap accent
1/4 yard of salmon net print for interior pocket
1/2 yard of batting for interfacing
2 yards of off white cotton webbing, 1" wide
2 d-rings, circle rings, or rectangular rings for the side loops
2 lobster clasps for the cross body strap, 1" wide
1 magnetic closure for the flap
coordinating thread
adhesive basting spray


Cutting
(2) 10 x 13" rectangles from denim for main body exterior
(2) 10 x 13" rectangles from lion print for main body lining
(4) 10 x 13" rectangles from batting for main body interfacing (exterior and lining)
(1) 7 x 10" rectangle from salmon net print for pocket
(1) 5 x 7" rectangle from batting for pocket interfacing
(1) 7 x 10" rectangle from denim for exterior flap
(1) 2 1/2 x 10" rectangle from lion print for exterior flap accent
(1) 9 x 10" rectangle from lion print for flap lining
(2) 9 x 10" rectangle from batting for flap interfacing
(1) 1 x 11"cotton webbing for top handle
(2) 1 x 3" cotton webbing for side loops
(1) 1 x 50" cotton webbing for cross body strap (adjust this as needed for your height -- I'm almost 5'11" tall!)


1. Fuse the 10 x 13" batting pieces to the wrong side of the main body exterior and lining pieces using the adhesive basting spray. Cut a 1 1/2" square out of the two lower corners of each piece (see photo).


2. Fuse the 5x 7" piece of batting to half of the pocket piece on the wrong side of the fabric.


Fold the fabric in half with right sides together and sew 1/4" from the edge around the folded piece, leaving a 4-5" gap on the long open side. Turn the piece right side out, tuck the raw edges into the gap, press, and sew 1/8" from the edge all around the piece.


Place the pocket on the right side of a main body lining piece, 2" from the top (13" long) edge and 3 1/4" from the (10" long) sides.


Sew twice (1/8" and 1/4" from the edge) along the sides and bottom of the pocket, backstitching at both ends and leaving the top open.


3. Insert half of the magnetic closure on the right side of the main body exterior, centered 4" from the top (13" long) edge.


4. Pin or clip the exterior pieces right sides together and sew along the sides and bottom, leaving the cut out squares open. Backstitch at the beginning and end of each side. Repeat with the lining pieces, but leave a 6" gap in the bottom of the lining for turning later on.


5. Box the lower corners of the exterior and lining. Pinch the open squares in the lower corners together so that the side seams meet. Sew 1/4" from the edge at least once -- I like to reinforce by doing it twice. Repeat for all three of the other open corners on the exterior and lining body pieces. Turn the exterior piece right side out.


6. Make the flap. Sew the exterior main flap and accent piece together along a 10" side (see photo). Fuse the batting to the wrong side of this piece. Top stitch 1/8" above and below the seam.

7. Fuse batting to the wrong side of the flap lining piece. Insert the other half of the magnetic closure centered about 1 1/2" from the top of the flap (look at this carefully if you're using directional fabric).


8. Use a round object like a cup as a guide to trim a curved section from the top corners of your flap lining and the bottom corners of your flap exterior (see photo). Place flap lining and flap exterior right sides together and sew 1/4" around the sides and bottom, leaving the top open and backstitching at both ends. Clip around the curves without cutting into the seam. 


Turn the flap right side out, pushing out the corners with a chopstick. Press and topstitch 1/8" from the edge around the sides and bottom of the flap.


9. Place the exterior side of the flap against the back side of the main body exterior (the side without the magnetic closure). Center it (it should be about 1 1/2" from the side seams) and line up the open raw edges of the flap with the top edge opening of the bag. Baste 1/4" from the raw edges to hold the flap in place.


10. Place the main body exterior inside the main body lining with right sides together. Be sure that the interior pocket is facing the flap lining where it's attached to the exterior main body. Clip or pin around the top edge, matching up the side seams first. Sew 1/2" from the edge.


11. Pull the bag right side out through the hole in the lining and give it a good pressing. Tuck the raw edges of the lining into the gap and stitch just along the edge to close it up, backstitching at both ends. Topstitch 1/8" from the edge of the bag opening all the way around, keeping the flap out of the way as you sew.


12. Make the top handle. Fold the short ends of the 1 x 11" handle piece under about 1" on each side.


Place the short folded end 1 1/2" from the side of the flap and 1 1/2" from the end of the flap that's sewn to the bag (see photo). Sew a 3/4" square with an X inside to hold it in place.


Repeat on the other side of the handle.


13. Make the side loops. Take a 1 x 3" piece of webbing and fold a short end under about 3/8". String your hardware of choice (d-ring, circle, or rectangle) onto the webbing. Fold the entire piece in half so the short ends meet, tucking one short end inside the 3/8" fold (see photo). Sew 1/8" from the 3/8" fold to hold this in place.


14. Place the side loop on one of the exterior side seams with the hardward pointed up toward the bag opening. Center the loop on the side seam about 3/4" from the opening. Sew 3 lines, 1/8" apart, from the lower short end of the loop, backstitching over each line once. Repeat on the other side of the bag with the other side loop.


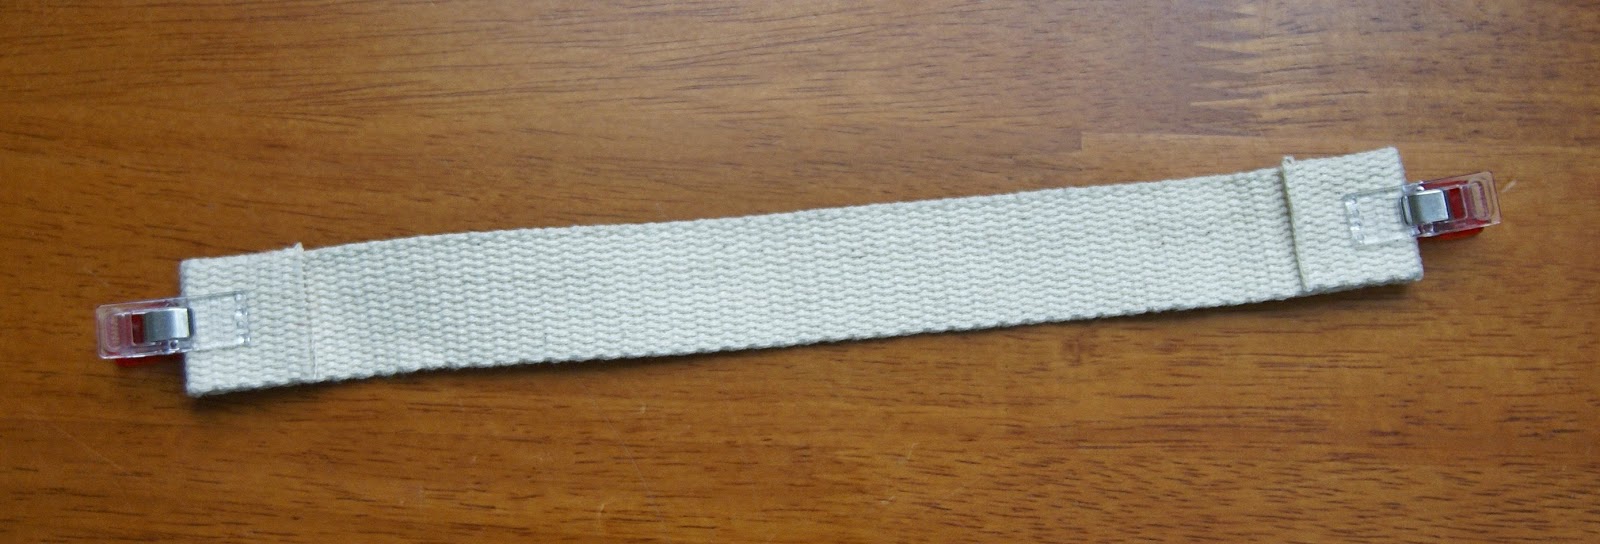
15. Make the crossbody strap. Fold a short end of the long strap under 1/2". String on a lobster clasp and fold the short end under 1/2" one more time. Sew 1/2" from the end fold, backstitching at least twice over the line. Repeat on the other end of the strap with the other clasp. Attach the crossbody strap to the side loops, and you're done!

Malibu Satchel Tutorial by Heidi Staples of Fabric Mutt

If you make a Malibu Satchel of your own, please share! Tag it #malibusatchel on Instagram and be sure to tag me too @fabricmutt. I hope you enjoy using this little bag as much as I do!
Related Posts Plugin for WordPress, Blogger...