Wednesday, May 28, 2014

Graph Paper QAL: Fabric & Themes


It’s been wonderful to hear how many of you are going to be sewing along with us for the Graph Paper Quilt Along! There's a lot of freedom built into this event on purpose. I want it to be a fun, relaxing experience for all of you.  Remember that the only requirement is that you use patchwork squares – any size, any fabric, any pattern. Just to get you started, I’ve pulled together some ideas that will work for either your quilt or your small projects. Take a look and see what you like!

Fabric Auditions
Unless you have a stack of prints that you’re dying to use in your next project, you may be looking for some inspiration. Here are a few auditions from my own stash: 

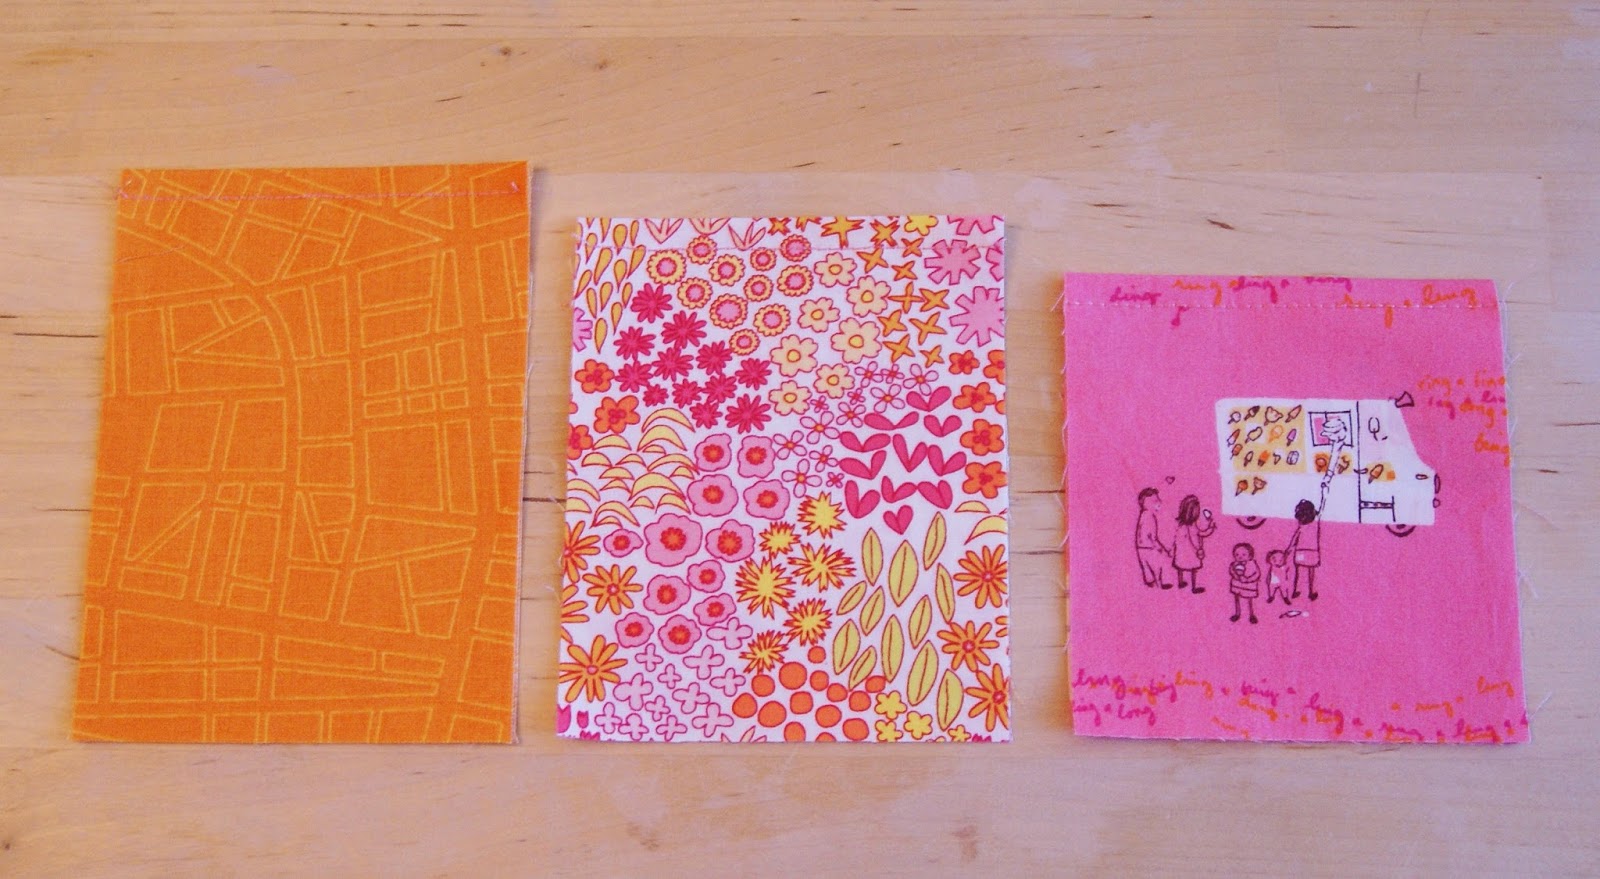
I love these colors together. They remind me of summer sunsets.

1. Go Solid: a project made with only solids is so clean and modern. Limit your color palette for special effect.

I used the print on the left from the Grey Abbey collection to guide the rest of my choices.

2. Go Low Volume: Use prints with a predominantly white or cream background for a look that’s quiet but still full of personality.

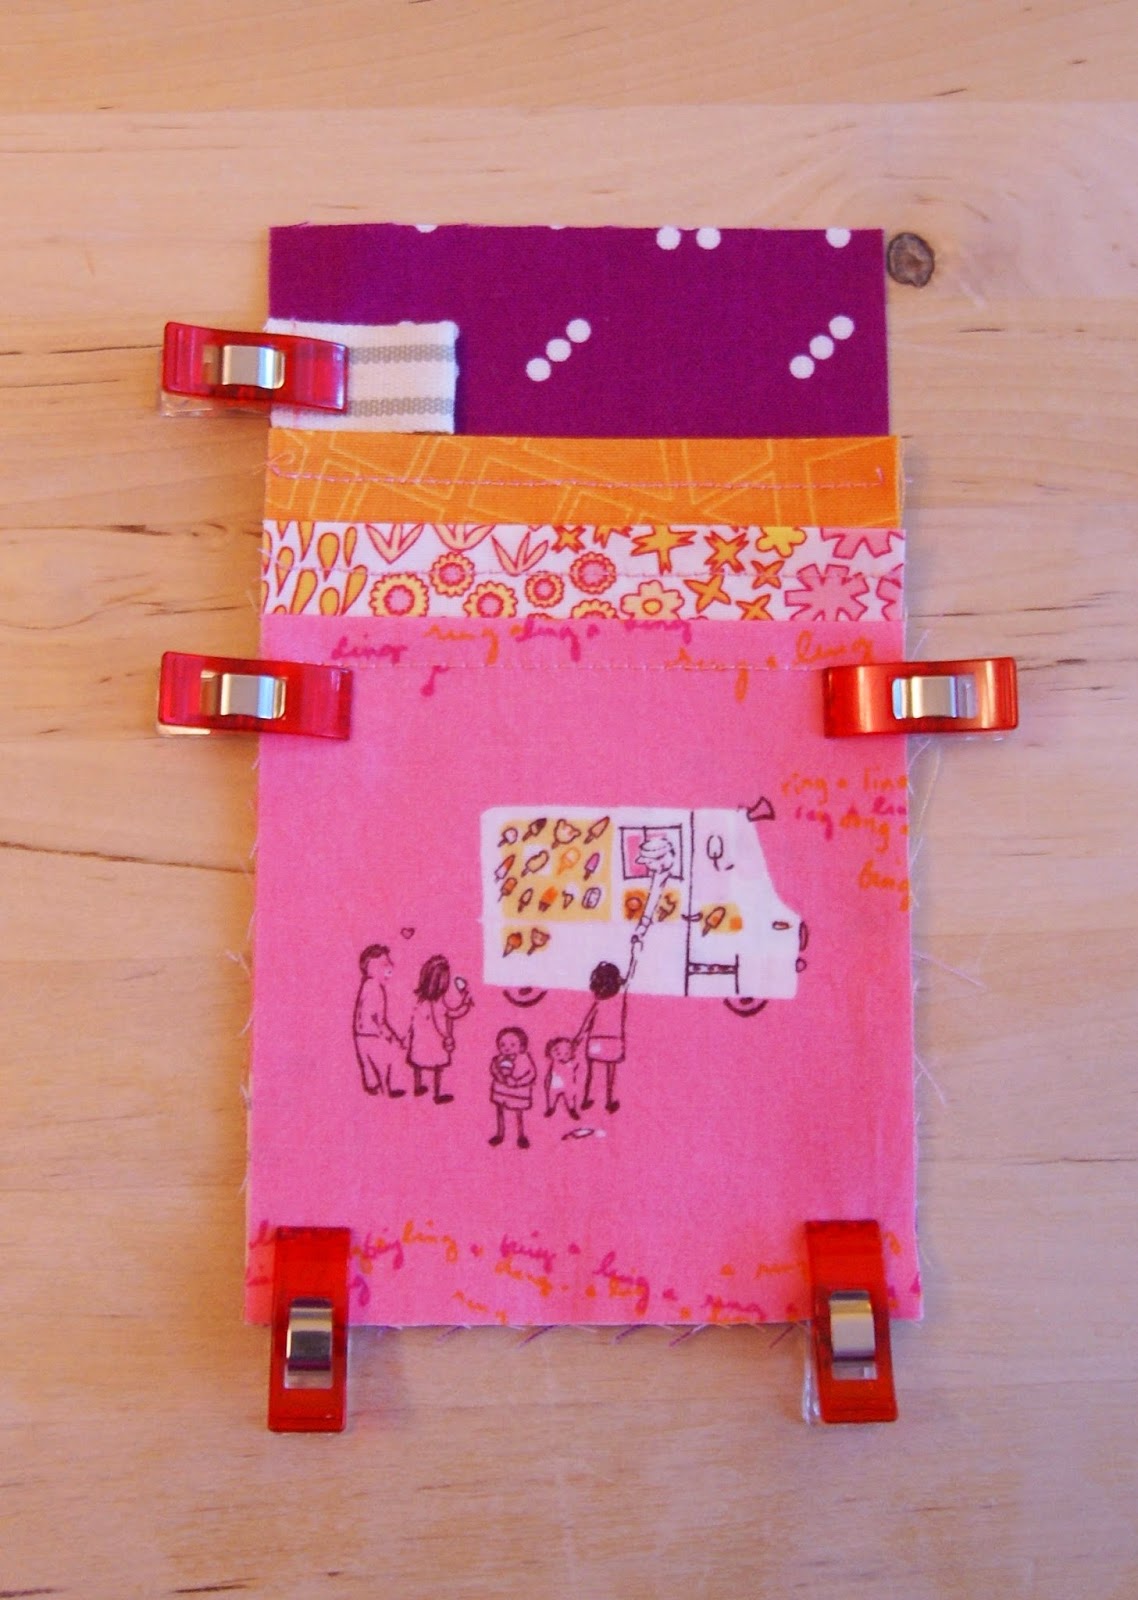
I love mixing up a rainbow of colors with kid friendly prints.

3. Go Juvenile: Kid friendly novelty prints make wonderful “I-Spy” projects, perfect for games and storytelling activities with the little ones in your life.

A portion of my embarrassingly large Denyse Schmidt stash

4. Go Designer: We all have our own private hoards of fabric by our favorite designers. Instead of letting those prints languish on the shelf, this is your chance to showcase them in a practically foolproof project.

Of course, there are plenty of other themes to choose from. Pick a design element like dots, flowers, or geometric prints. Take the color palette from one favorite print and pull other fabrics to match. Use two complementary fabric collections from different designers and mix them up for a totally new look. The possibilities are endless!

Close up from my first Mosaic Bag - a loose variation on a plus pattern

Pattern Ideas
There’s nothing wrong with just spreading your squares out randomly and sewing them together, but some of you may be looking for something a little more unique or would just rather work off an established pattern. Here are some links that might interest you. 


Remember that this quilt along is all about fun and creativity. If you decide to add some borders or a rogue half square triangle to your pattern, I'm not going to kick you out on a technicality. Try to stick to the square pattern as much as you can, but if something amazing is calling your name, then answer the call! Now is the time to start choosing fabric and a pattern, and then you'll want to get to work on cutting out all those beautiful squares. I'll have a few cutting tips for you on Monday along with our first small project tutorial link. Is it a good pattern? Let's just say that I want to make a million of these...

Friday, May 23, 2014

The Graph Paper Quilt Along


I've always loved graph paper...something about all those little squares of possibility lying there in front of me. It was one of my favorite things to draw on as a child, perfect for creating intricate mazes when I was a teenager (any of you remember those?), and now works as my trusty sketchpad for new sewing ideas. So when I was choosing a name for my next event here at Fabric Mutt -- yes, a square centered event -- I just couldn't resist calling it the Graph Paper Quilt Along.

Patchwork Square Projects by Heidi Staples at Fabric Mutt
1. Botanics Desk Mat, 2. Scrappy Square Pillow, 3. Color Study Baby Quilt, 4. Crossword Quilt, 5. Doll's Sleeping Bag, 6. Bear's Floor Pillow, 7. Patchwork Case for Scribble & Write, 8. Mosaic Bags, 9. Another Perspective

Believe me, I love a challenging new quilt pattern; I can appreciate the joys of paper piecing and improv quilting, and I like a good sampler every now and then. Over and over, though, I find myself returning to the simplest method of quilt piecing: the humble patchwork square. I love working with squares, as you can see from the mosaic above, for several reasons. They're so versatile for one thing. The squares can just be squares, or they can be part of a bigger picture like a checkerboard, modern crosses, or a pixelated design of your own. I also love that fabric really takes center stage in a quilt full of squares, and they're absolutely perfect for fussy cutting -- something I love to do. There is a simplicity here that speaks to my soul when I'm feeling worn down or in need of fresh inspiration.

I loved getting feedback from all of you through my Giveaway Day question about your favorite kind of sew along. Quilts definitely led the pack, but not far behind were small projects which were championed by those of you who, like me, don't always have enough time in your schedule to devote to a large project. We're going to try something crazy here and see if we can have the best of both worlds. I'm offering you three options to choose from in this quilt along:

Option #1: Make a quilt. The only rule is that your quilt has to be made of squares. That's it. The size of the project (king size? lap size? mini size?) as well as the squares (1"? charm squares? layer cakes?) is up to you and so is the design made by your squares. I'll have some ideas for you to use as a starting point in my next QAL post, but start dreaming now. The freedom is unlimited here!

Option #2: Make small projects. Every other Monday I'm going to post a link to a free online tutorial that features patchwork squares, and I'll have my own version of the project to show you. If you don't feel like you can commit to a quilt, no worries! Feel free to sew along with us by sewing up a small patchwork project each week instead.

Option #3: Make a quilt AND small projects. Overachievers unite! We can do it all! If you've got the time and energy, spend a few days each week on your quilt and then a few days on the small project. You'll be overflowing with patchwork goodness by the end of this event!

I debated long and hard about having sponsors and offering prizes for this quilt along, and though it's the norm to do so, I decided against it this time. Though I love a nice prize package as much as the next person (and believe me, I do!), I don't want there to be the slightest smidgen of pressure on anybody during this event. Every once in a while it's nice to participate in a sew along with no judging, no comparing yourself to others, and no killing yourself to finish something by a deadline for the chance of winning free stuff. It's just you and your fabric having fun together as you sew something that you love...and all of us cheering you on while you do it. I'll be having link-ups here at Fabric Mutt every two weeks during the quilt along where you can share your small projects and quilt progress, and you can also post your photos in the Graph Paper Quilt Along Flickr group here. If you'd like to have an official quilt along button for your blog, just grab the code from my sidebar on the left.

So what do you say? Want to join me? If so, here's the schedule:

May 29th: Quilt Along Prep Post -- Ideas for Fabric & Themes
June 2nd: Small Project #1 & Cutting Your Quilt Fabric
June 9th: Progress Link-up #1 & Patchwork Piecing Tips
June 16th: Small Project #2 & Ideas for Your Quilt Backing
June 23rd: Progress Link-up #2 & Ideas for Quilting Designs
June 30th: Small Project #3 & Tips for Finishing Your Quilt
July 7th: The Final Link-up -- Show us the patchwork!

I'd love it if you would share the word about this event on your blogs and social media -- use the hashtag #graphpaperqal and you can tag me @fabricmutt too if you like. This quilt along is perfect for beginners or those new to any sort of sew along, so all rookies are welcome here! If you have any questions, feel free to email me at hjstaples@gmail.com.

Okay then...pull out your graph paper and a stack of colored pencils...ready...set...go!

Wednesday, May 21, 2014

Recipe for a Table Runner

Anna Maria Horner Quilted Table Runner by Fabric Mutt

Sew together a stack of prints by Anna Maria Horner.

Anna Maria Horner Quilted Table Runner by Fabric Mutt

Add some dense quilting courtesy of Aurifil thread in a lovely shade of gold. Be sure to sew back and forth in different directions to tug at the center seam so that it waves gently down the runner.

Anna Maria Horner Quilted Table Runner by Fabric Mutt

Include a Juliana Horner print on the back and some Kona Ivory for the binding.

Anna Maria Horner Quilted Table Runner by Fabric Mutt

Sit, stare, and be happy.

Tuesday, May 20, 2014

Stay Tuned


Coming soon to a blog near you...the most laid back quilt along of all time.

More details to come in a day or two!

Friday, May 16, 2014

Tutorial Update & a Winner


First off, congrats to Janet who won the Giveaway Day prize from Fabricworm! I've sent you an email, Janet! Thanks to everyone else who stopped by this week. I hope to see you here again!

Second, since several of you mentioned that you'd like to make a few of your own, I thought I'd save you the time crunching numbers and give you the measurements I used to enlarge my Key Pouch Tutorial to the right size for a child's pair of glasses. Here they are:

Glasses Pouch Materials
(2) 4 x 7 1/2" rectangles for zipper pouch exterior
(2) 4 x 7 1/2" rectangles for zipper pouch lining
(1) 4 x 5 1/2" rectangle for front pocket
(1) 4 x 7 1/2" rectangle for second pocket
(1) 4 x 9 1/2" rectangle for third pocket
(1) 4 x 11 1/2" rectangle for back pocket

Even though there are more pockets on the front, you can follow the same assembly instructions from the original tutorial, and it should all work out okay. Let me know if you have any questions. If you make one, be sure to share the photo with me by email or tag it #glassespouch and tag me @fabricmutt on Instagram.

Happy weekend, my friends!

Wednesday, May 14, 2014

Lotus Pond Glasses Case


My little Bear started wearing glasses just over a year ago. She wasn't much over six months old when we noticed that she had a lazy eye, but her doctor was kind enough to hold off on ordering her glasses until she was three years old and had some chance of keeping them on. When I think of how irresponsible I was with my own glasses as a child, I've been pretty impressed with how quickly and calmly Bear accepted her pair as a part of life. It may have something to do with the fact that my little sweetheart is blind as a bat without them. Everyone from the eye doctor to his nurse to the guy selling the shockingly thick pair of lenses to us at Costco kept insisting, "Make sure she wears them all the time. She really needs them."


Those of you who have children who wear glasses know that those lenses stay clean for approximately fifteen minutes out of every day, so we've learned to keep a large supply of lens wipes on hand to help with the constant smudging. Bear has been begging me to sew a case for her glasses, preferably one with a compartment for wipes too. I was thinking through ideas of how I wanted to design it, when it suddenly occurred to me that all I had to do was enlarge my key pouch tutorial from earlier this month. And the rest is history.


All the prints in this project come from Lotus Pond, Rae Hoekstra's adorable new collection for Cloud9 Fabrics. I've been excited about this fabric since I saw the first images months ago, and it's even better in person. I love her color choices (nowhere else have I seen that perfect shade of kelly green) and those sweetly whimsical illustrations. I'll definitely be buying more of this collection in the months to come.

Two yards of Feather River from Birch Fabrics is still up for grabs until Friday night, so stop by my Giveaway Day post to get your name in the drawing if you haven't done it yet. I've had so much fun getting to know more of you this week through your comments on that post. Meet me back here on Friday, and I'll have a winner for you!

Monday, May 12, 2014

Giveaway Day: May 2014 Edition

1. Envelopes, 2. Polly Key Pouch, 3. The Ellie Travel Case,
4. Everyday Party Quilt, 5. Rainbow Patch Baby Quilt, 6. Grey Abbey Pouch

***THIS GIVEAWAY IS NOW CLOSED! THANKS FOR ENTERING!***


Giveaway Day is here again! It's always such a pleasure to join in the fun with Sew, Mama, Sew! and the rest of the online sewing community. I'll try to keep it short since you've got lots of blogs to visit today. Here's what you need to know...

1. The Blog: If you visit my blog on a weekly basis, you're going to see projects and tutorials like those featured in the mosaic above. Click on any of the buttons to the left if you'd like to stay posted on what I'm making. I'd love to see you here again!

Photo courtesy of my dear friend Beth at Plum and June

2. The Prize: My lovely friends at Fabricworm have donated two yards of Feather River by Jay-Cyn Designs for Birch Fabrics to share with one of you. I'm a huge fan of Birch's organic fabric, and this soon to be released collection is absolutely perfect for summer sewing projects! You can see the whole collection here at Fabricworm.

3. The Drawing: To enter the giveaway, all you have to do is leave a comment below answering this question: What's your favorite kind of sew along: quilts? bags? small projects? sewing through a whole book? Followers, new and old, can leave an extra comment for a second entry. Please make sure that your email address is in your comment if you're a no-reply blogger. The giveaway is open internationally and will stay open until 5pm on Friday when I'll choose a random winner. If I don't hear from the first winner within 48 hours, I'll have to pick another name, so be sure to check your email this weekend!

Thanks so much for dropping by!

Tuesday, May 6, 2014

On the Way


There are approximately three things that remind me that summer is on the way.

1. The end of the school year
2. The rising of the thermometer
3. The Let's Get Acquainted Blog Hop hosted by Plum and June

Of course, this year Beth is freshening things up with a new name, but I guarantee that you'll find the same great content that this blog hop brings to the web each summer: great advice, fresh faces, and new inspiration. If you've started a sewing blog sometime in the last two years and would like the chance to introduce yourself to the modern quilting community, visit the official blog hop page to find out how you can get your name in the ring. Can't wait to meet you!

Thursday, May 1, 2014

Key Pouch Tutorial

Key Pouch Tutorial by Heidi Staples at Fabric Mutt

Say hello to your new best friend in the last-minute-gift-giving department: the Key Pouch. This project is...
  • quick to sew
  • fabulous for fussy cutting
  • economical -- all the pieces are fairly small (get out those scrap buckets!) and no interfacing needed
  • adaptable to any age, gender, or occasion according to your fabric choices
  • easily upgraded with the addition of a gift card in one of the front pockets
Let's get to it!


Materials:
(1) 3 1/2 x 7 1/2" rectangle for small front pocket
(1) 3 1/2 x 8 1/2" rectangle for medium middle pocket
(1) 3 1/2 x 9 1/2" rectangle for large back pocket
(2) 3 1/2 x 6" rectangles for zipper pouch exterior
(2) 3 1/2 x 6" rectangles for zipper pouch lining
(1) 1/2 x 2" piece of twill tape (not pictured)
(1) zipper, 7" or longer


Step 1: Take the three rectangles for the outer pockets and fold them in half, wrong sides of fabric together, so that the short ends meet. Topstitch each piece 1/4" below the fold.


Step 2: Stack the outer pockets in place on top of one of the zipper pouch exterior rectangles, making sure that the pockets line up in the correct order from small to large (see photo above). Fold the twill tape in half and stitch 1/8" from the raw ends to hold them together. Place the twill tape on the left side of the stack just above the large back pocket with the raw edges toward the left side (again, see photo).


Baste the entire stack together 1/8" from the edge around the sides and bottom to hold everything in place.


Step 3: Now that your front exterior piece is assembled, sew this together like a basic zipper pouch. Stack in this order from bottom to top, lining everything up on the right edge: front zipper pouch exterior piece with pockets, zipper (face down with pull at the top), zipper pouch lining piece.


Sew 1/4" from the edge and press the fabric back from the zipper so that the wrong sides of the fabric are touching.


Repeat with the other zipper pouch exterior and lining pieces on the other side of the zipper.


Step 4: Unzip the zipper part way (do NOT forget to do this!) and then place the exterior pieces with right sides together and the lining pieces with right sides together (see picture below), clipping or pinning them in place. Make sure that the teeth of your zipper are pointed toward the exterior end of the pouch.


Step 5: Starting at the bottom corner of the pouch lining, sew 1/4" from the edge all the way around the lining, exterior, and back around just past the other corner of the lining (see photo above), leaving a gap in the lining for turning and backstitching at both ends.


Clip the corners and trim off the edges of the zipper.


Step 6: Reach in through the lining and turn the bag right side out through the zipper. Poke out the corners of the pouch with a chop stick or turning tool and press it with your iron. Tuck the raw edges into the hole in your lining, press, and sew 1/8"-1/16" from the bottom edge of the lining to stitch it closed.

Key Pouch Tutorial by Heidi Staples at Fabric Mutt

Step 7: Tuck the lining into the pouch, press your bag one more time, and you're ready to go!

If you make one of these and share it on Instagram, be sure to add the hashtag #keypouch and tag me too @fabricmutt. Happy sewing!
Related Posts Plugin for WordPress, Blogger...